Engine Work Bench (manipulator)
Moderator: bobassel
-
- Posts: 107
- Joined: Thu Dec 29, 2005 12:17 pm
- Contact:
Engine Work Bench (manipulator)
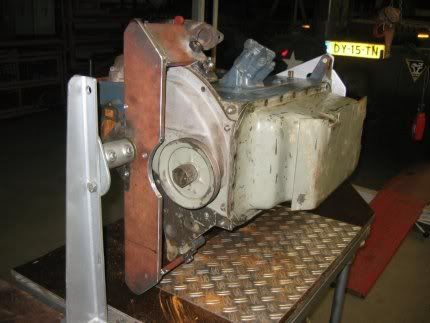
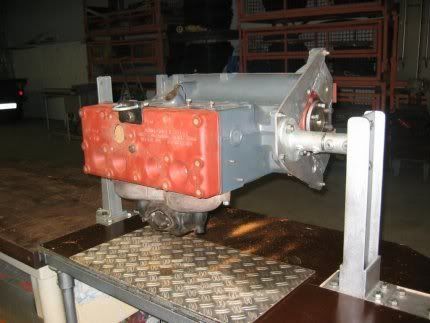
Photo of my just finished engine work bench. It's a manipulator not (yet) a test bench.
It makes cleaning, painting, fitting and mounting of the parts much more easy.
I used std. pipe clamps, bolts, nuts and some workshop scrap and weld- and grind equipment.
Most work was to find the gravity-points and the best mountings.
The front bracket was easy but the rear needed some attention because of the possibility to use the bench with and without the bellhouse.
Kind regards, Jan
2.jpg[/img]
GPA 1942 #3972
GPA 1943 #11933
GPW 1942 #34836
WLA 1942 #60724
WLC 1943 #5185
WC 56/57 COMMAND CAR
AMPHICAR
Collector:WW2 docs/prints amphibians.
Avatar: Tribute to Ben Carlin "Half Safe"
GPA 1943 #11933
GPW 1942 #34836
WLA 1942 #60724
WLC 1943 #5185
WC 56/57 COMMAND CAR
AMPHICAR
Collector:WW2 docs/prints amphibians.
Avatar: Tribute to Ben Carlin "Half Safe"
Re: Engine Work Bench (manipulator)
Wow, that looks great Jan. Beats trying to flop it over while lying on the bench. David
GPA 9545
GPA 10568
1965 Apollo BP capsule A36
1960 Gemini BP capsule MSC 312
GPA 10568
1965 Apollo BP capsule A36
1960 Gemini BP capsule MSC 312
-
- Posts: 107
- Joined: Thu Dec 29, 2005 12:17 pm
- Contact:
Re: Engine Work Bench (manipulator)
David,
Thanks. In time I will try to make a drawing for interested members of the list.
The right gravity point posision is important.
It's in front nearly in-line of the 3 horizontal tread holes under the waterpump.
About 3/4 inch (19 mm)left of the middle tread hole (front view!).
To get the right posision in the rear you can make (vertical) by measurements from the top of the engine and the valve cover side (horizontal).
O.c. the gravity point can/will change when you mount parts or fill oil to the engine.
Hope you can make your own eng. work bench now ! :-)
Jan
GPA 1942 #3972
GPA 1943 #11933
GPW 1942 #34836
WLA 1942 #60724
WLC 1943 #5185
WC 56/57 COMMAND CAR
AMPHICAR
Collector:WW2 docs/prints amphibians.
Avatar: Tribute to Ben Carlin "Half Safe"
GPA 1943 #11933
GPW 1942 #34836
WLA 1942 #60724
WLC 1943 #5185
WC 56/57 COMMAND CAR
AMPHICAR
Collector:WW2 docs/prints amphibians.
Avatar: Tribute to Ben Carlin "Half Safe"
Re: Engine Work Bench (manipulator)
Jan, this may not be GPA related but it sure is related to your "Manipulator" - I just finished watching an episode of Tank Overhaul. This episode showed Dave and Dave on the Isle of Wight working on the Sherman that they restored by cutting two damaged units in half and then welding the good halves together. The relation to your manipulator is that they also had a jig to rotate their work... only this jig held THE ENTIRE SHERMAN CHASSIS, which they then rotated to make the welding easier!
I mean really, no tank restorer should ever half to climb all over his tank just to weld it together, should he? ;> David
GPA 9545
GPA 10568
1965 Apollo BP capsule A36
1960 Gemini BP capsule MSC 312
GPA 10568
1965 Apollo BP capsule A36
1960 Gemini BP capsule MSC 312
Who is online
Users browsing this forum: No registered users and 1 guest